GitLab is an open source end-to-end DevOps platform that helps developers with issue tracking and incident management. The app also offers an in-built time tracking functionality so your team can record the time spent on planning, developing, and testing any software.
And with the help of a GitLab time tracking report, you can assess how efficiently your employees merge requests, solve issues, and even identify potential bottlenecks.
In this article, we’ll discuss what a GitLab time tracking report is and its four key components. We’ll also highlight its limitations and how to integrate GitLab with Time Doctor to overcome those limitations.
Table of Contents
- What is a GitLab time tracking report?
- 4 key components of the GitLab time tracking report
- 4 limitations of using the GitLab time tracking report
- Time Doctor: For efficient time tracking with GitLab
Let’s go!
What is a GitLab time tracking report?
The GitLab time tracking report essentially gives the project manager a breakdown of the time developers spend on any stage of project management.
You can add an estimate and track your time on any issue or task in GitLab.
Here are the two ways in which the GitLab time tracker functionality works:
- Add the time estimate to indicate the total time you require to complete a specific task or project.
- Make a manual time entry to log your time working on any task.
GitLab.com deploys gtt, a command line interface that monitors the time you work on an issue or collaborate on a merge request.
Being a product of the open-core company GitLab Inc., the software allows developers to create code and perform various Git operations. Later on, they can access the code and make any necessary edits on the GitLab repository – a code storage system.
And to track the amount of time for such day-to-day tasks, you can use quick action (text-based shortcuts for frequent activities that involve selecting buttons or dropdowns in the GitLab UI) for greater efficiency.
Whether you want to add a time estimate or log the time spent, you can choose either of the two quick actions for tracking time on GitLab – /spend and /estimate.
Based on the time entry, the tool generates a time tracking report to give you a summary of your employee’s working hours.
The time tracking data appears on the right sidebar in issues and merge requests like this:
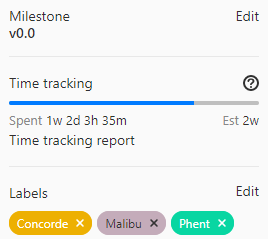
To see the time entries for a particular task or issue, you can expand the report by clicking on Time tracking.
You can even add due dates to your issues to keep track of deadlines.
Now let’s explore four crucial aspects of the GitLab time tracking report.
4 key components of the GitLab time tracking report
Here are four primary elements that form the basis of a GitLab time tracking report.
1. Adding time estimates
The time estimate indicates the total time you anticipate for completing an issue or commit message at any given project level.
To enter the time estimate, all you’ve to do is type the slash command /estimate and enter an estimate of the time you’ll require to complete a particular task. You can enter the command in the descriptions or comments of any issue, epic, merge request, and commit.
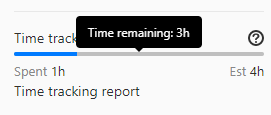
To view the remaining estimated time of your task, you can hover over the time tracking information in the right sidebar of the dashboard.
However, you need to have the Reporter role to make the time entry for a particular project.
Let’s say you need to enter the time estimate of 2 months, 3 weeks, 5 days, 6 hours, and 10 minutes, you’ll have to type /estimate 2mo 3w 5d 6h 10m. You can refer to the acceptable time units available on GitLab.
Note: Any issue or a merge request you want to track time for can have only one estimate. Each time you enter a new time estimate, the tool will ignore the previous estimate.
2. Logging time spent
Developers can even log the time they’ve spent working on any project management task or a new issue.
To add the time spent, all you’ve to do is type the slash command /spend to record your time working on any project. Every time you enter a new time spent, that duration is added to the total time spent by the employee working on a particular task.
Let’s say you need to create the time log for 1 month, 1 week, 4 days, 1 hour, and 15 minutes, you’ll have to type /spend 1mo 1w 4d 1h 15m.
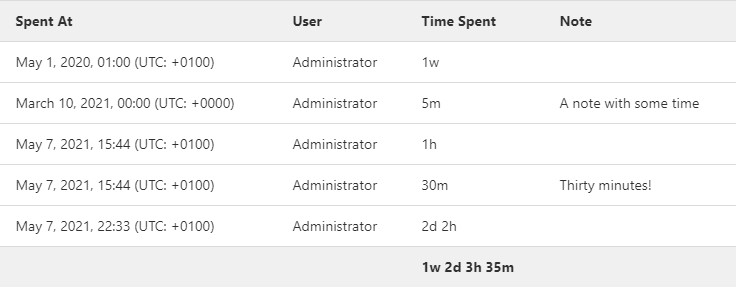
If you want to leave some critical notes on your time tracking report, create a comment with a description and use the slash command to add the time spent. This information will appear under the Summary/Notes column of the time tracking report like this:

Additionally, the tool allows you to add a time log for any issue tracking task done in the past. For this, you need to provide the exact date after the time.
So to log 1 hour spent on 2nd February 2022, you’ll have to type the command /spend 1h 2022-02-02.
3. Accessing time tracking data
As a project manager if you want to assess the performance of the development team, you can view the GitLab time tracking report for proper analysis.
Here’s how you can view the report:
- Visit an issue or a merge request.
- In the right sidebar, click on the Time tracking report. You can view up to 100 tracked time entries for a particular employee.
4. Choosing available time units
The GitLab time tracking report follows specific time units that you need to keep in mind while entering the time estimate or time spent for any new issue:
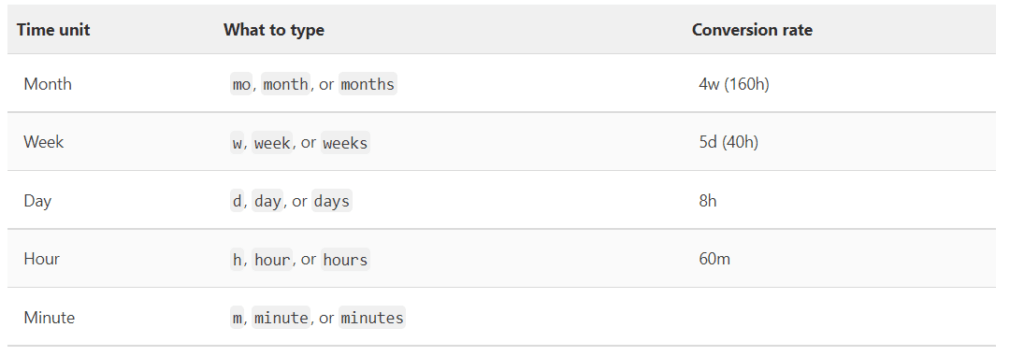
You may stick to only using the time units for hours to simplify things. So instead of recording the time spent as 1w 4d 3h, it will be displayed as 75h.
To activate this option:
- Select Menu > Admin from the top bar.
- Go to Settings > Preferences on the left sidebar.
- Expand Localization.
- Under Time tracking, select the Limit display of time tracking units to hours checkbox.
- Click Save changes.
Now that we know how to create and view the GitLab time tracking report, let us go over some of its major limitations.
4 limitations of using the GitLab time tracking report
GitLab is beneficial during multiple stages of the DevOps lifecycle for planning tools, source code management (SCM), issue tracking, and CI/CD.
But while it can generate time tracking reports, it still lacks several additional time and productivity management features like:
- Tracking the idle time during their work hours.
- Allowing admins to review and approve a timesheet.
- Processing payroll and streamlining payments for team members.
- Letting the admin oversee employees’ online activity and measure their real-time productivity.
You can resolve these limitations by using the GitLab integration for Time Doctor, a dedicated time tracking tool that can help you create detailed reports.
Time Doctor: For efficient time tracking with GitLab
Time Doctor is a powerful time tracking and performance management app that helps track employee productivity. Used by large enterprises like Verizon and small businesses like Thrive Market, Time Doctor is the perfect employee management tool for any business.
The tool offers integrations with various apps like Jira, Azure DevOps, and GitHub.
In fact, with Time Doctor, you can generate time tracking and productivity reports for your GitLab projects.
Let’s see how you can integrate GitLab with Time Doctor for best results.
How to integrate GitLab with Time Doctor
The Time Doctor integration allows developers to track their Gitlab issues and tasks.
It adds a Start Timer button on the project or task you’re working on in Gitlab that you can click on to start recording the time.
This way, developers won’t have to switch between apps constantly, preventing workflow disruption.
Here’s how you can get started with Time Doctor’s GitLab Integration:
- To begin with the GitLab time tracking integration, download and install the Time Doctor app (available as both desktop and mobile app). The app runs on major operating systems like Windows, Linux, Mac, and Android.
- Download the Time Doctor Chrome extension and add it to your browser.
- Log into your Time Doctor account on the desktop.
- You’ll now be able to see the Start Timer button in your GitLab project.
- Click on that button and start tracking the time you spend working on GitLab issues through Time Doctor.
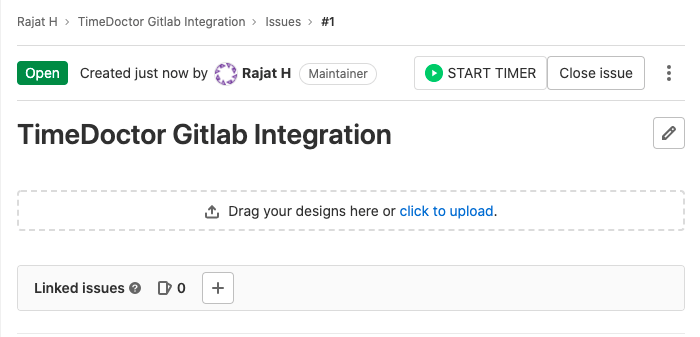
Here’s how GitLab users can benefit from Time Doctor’s Chrome browser extension:
- View the timer and total time you spend on issue tracking or any other task.
- Find the time reported by every employee for working on the issue and how close they are to the original time estimate.
- Group, sort, filter, and export time tracking reports and create accurate client invoices.
And there’s more to it!
Time Doctor offers multiple productivity tracking features that can help you boost workplace efficiency.
Let’s briefly explore the robust features of Time Doctor that can help you improve time management and report generation:
A. Track working hours
Employees can track their time for various tasks using Time Doctor’s manual or automatic time tracking feature.
Follow the steps below to use the manual/interactive mode:
- Open the Time Doctor app and enter your task name.
- Press Start to start tracking your time.
- Hit Stop when you want to take a break or have completed the task.
- If you’re going to move on to another task, enter the new task name and repeat the above steps.
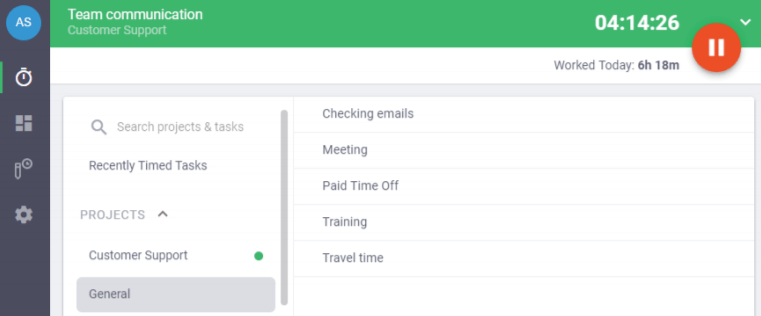
In the automatic time tracking mode, the timer starts as soon as employees turn on their desktops.
It ensures that their working hours are recorded without fail, even when they forget to activate the timer by themselves. Additionally, employees will get detailed insights into their productivity.
B. Generate productivity reports
Time Doctor’s detailed reports make it easy for managers to evaluate their employees during appraisal cycles.
Through these reports, you can check how employees spend their working hours and recognize the top contributors in the team.
Here’s a list of the productivity reports offered by Time Doctor:
- Activity summary report: Get an overview of the active minutes, active seconds, unproductive, manual, and mobile time for every employee.
- Hours tracked report: Track and analyze your employees’ working hours daily, weekly, or during a selected period.
- Timeline report: Access daily and weekly reports on employees’ time on breaks and tasks.
- Projects and tasks report: View the time employees spend on multiple projects and tasks.
- Attendance report: Check when a particular employee is present, absent, partially absent, or late.
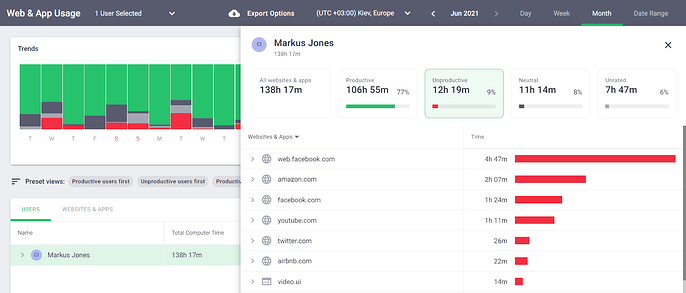
- Web and app usage report: Check your employees’ time on different websites and apps to assess their productivity. For example, creating reports on Google Sheets, compiling client notes on Google Docs, or attending a Microsoft Teams meeting can be productive, whereas spending time on social media sites may be unproductive.
C. Assign tasks and projects
Time Doctor allows managers (or admins) to create, add, or edit projects and tasks to track the exact billable hours.
Here’s what you need to do:
- Go to Settings/Company Settings.
- Enable the option Allow managers to create or add projects and tasks.
- Go to Settings/Projects & Tasks.
Note: If this page is not available for your company, you need to enable the Use Projects & Tasks feature in Settings/Company settings.
- Click on Add Project.
- Name the project and click on the button to add the new project to your project list.
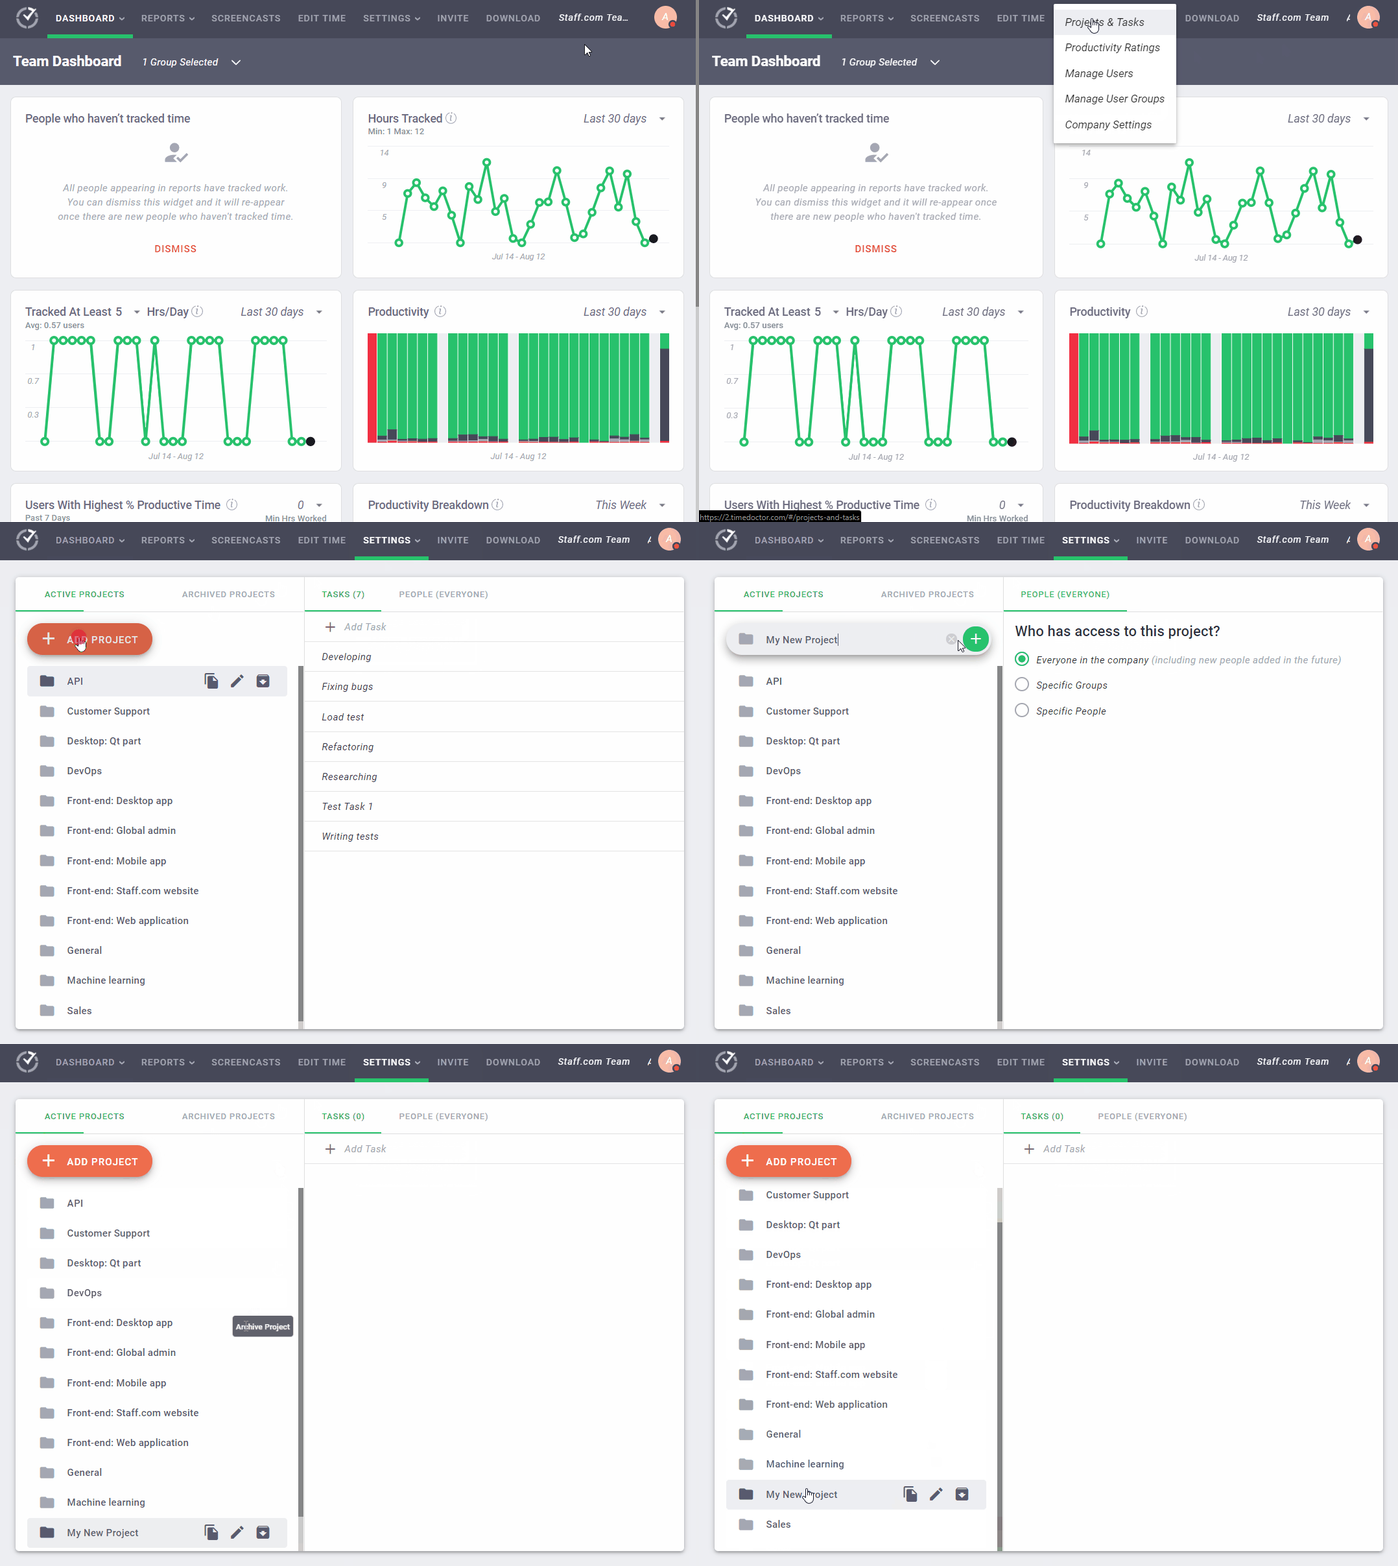
- To add specific tasks under a given project, click on Add task to name your new task.
- On the People tab of your selected project, select who should have access to that project and the tasks within it. You may assign the project to all employees, some employees, or a specific group of employees.
With this feature, you can track time for every client, task, and project separately. This way, you can keep tabs on each task’s progress and identify the ones taking up most of your employee’s time.
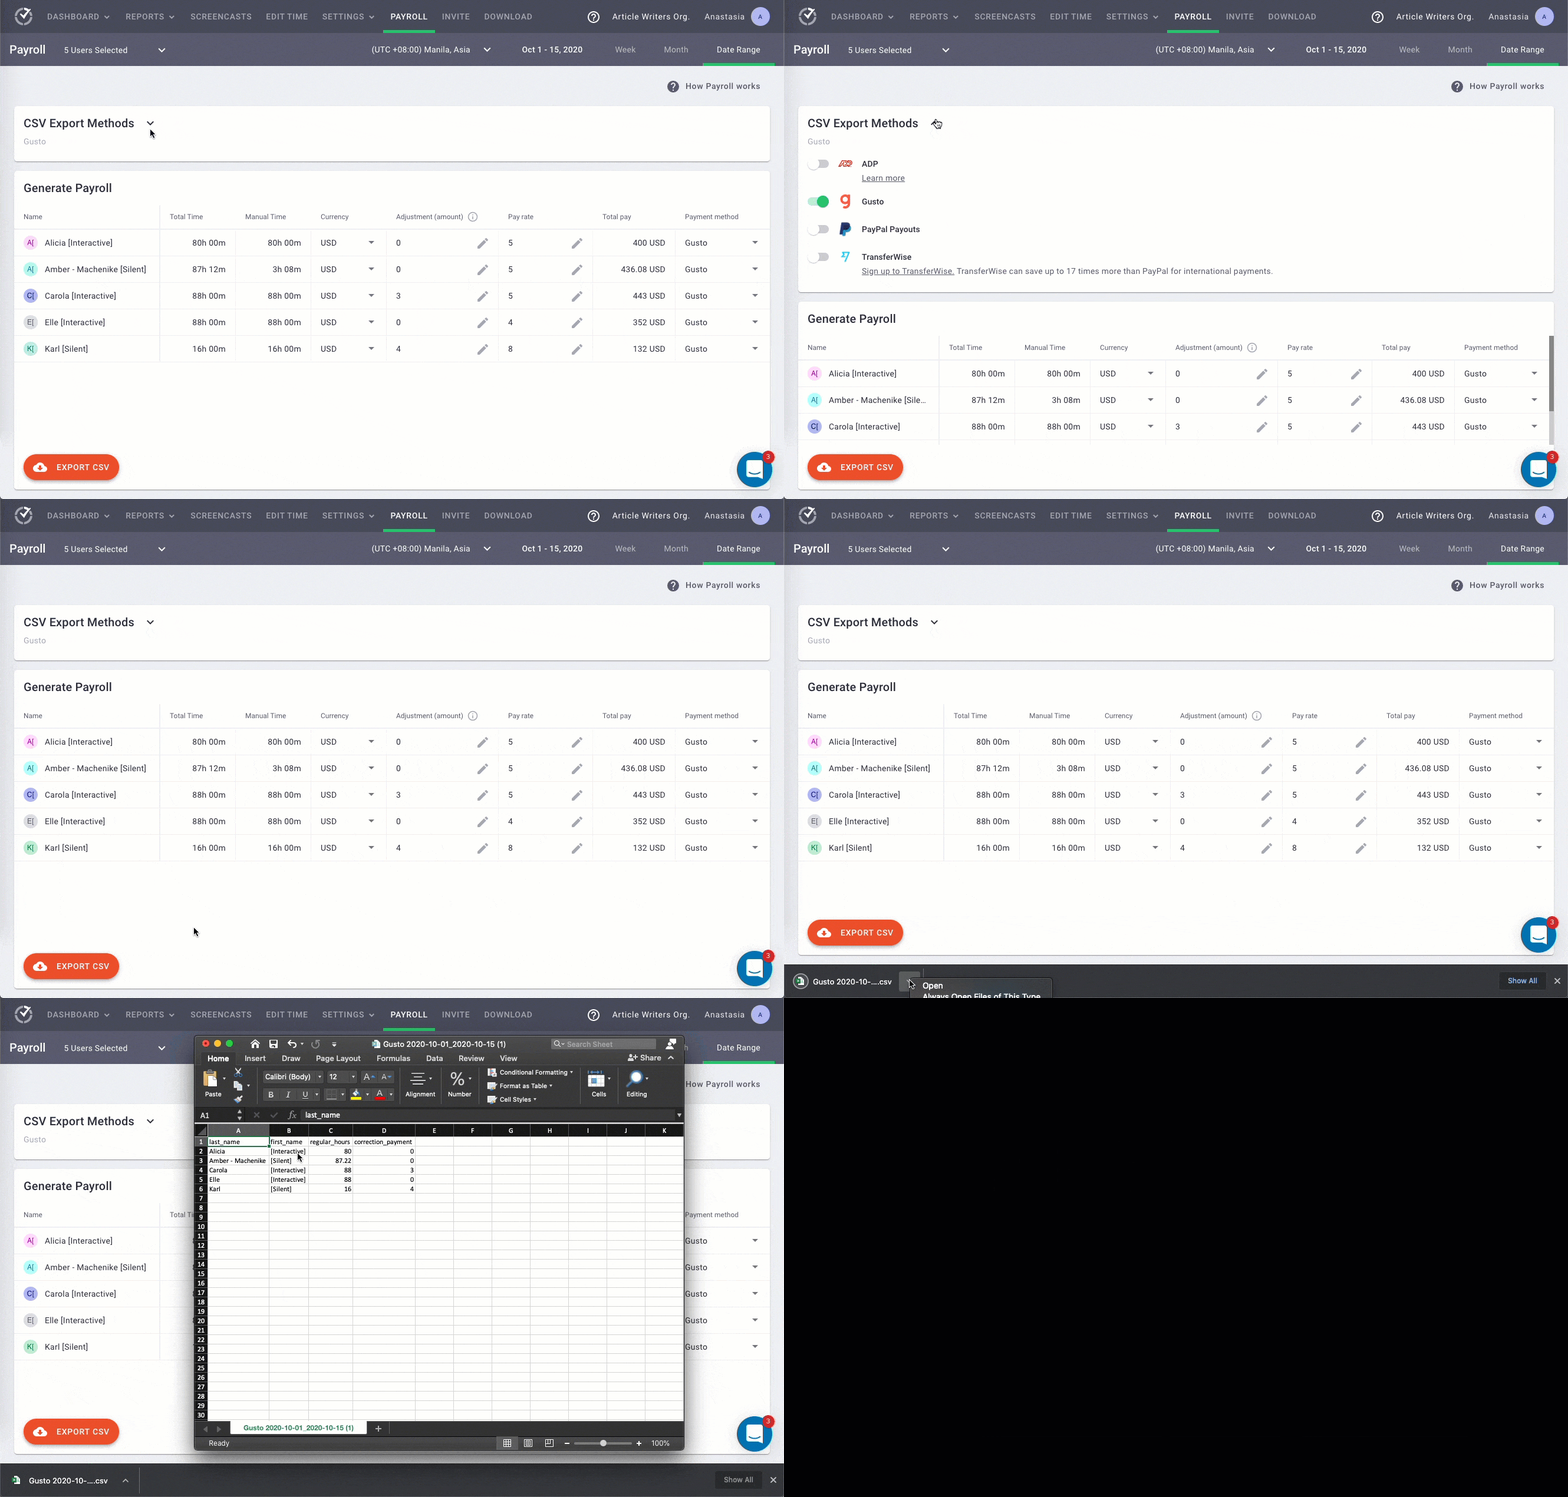
C. Manage payrolls
Time Doctor’s payroll integration can help you make batch payments and quickly execute bulk billing processes.
Here’s how you can set up the Payroll Management feature in Time Doctor:
- Enable Payroll from the Company Settings tab.
- Enable Integrated payment methods for apps like Wise, Payoneer, or PayPal.
- Select the team members you want to integrate into the payroll.
- Specify the date range (weekly, monthly, or otherwise) for the payroll.
- Select the right currency from the options in which you want your employees to receive the payment.
- Enter the payroll amount.
- Finally, select your preferred payment method.
You can even export the payroll as a CSV file and upload it directly to a payment platform of your choice.
Time Doctor offers these powerful features with pricing plans starting at just $6.70 per user/month! You can even opt for the tool’s 14-day free trial.
Wrapping up
The GitLab time tracking report is a decent option to record accurate time entries for tasks.
However, you cannot use it to identify or address your employee’s productivity, attendance, and time management problems.
That’s why you should use the Time Doctor integration for your GitLab tasks and todos.
Tracking the time for your GitLab issues through Time Doctor will empower you to generate comprehensive reports, assess employee performance, and boost their everyday efficiency.
So why not sign up for Time Doctor’s free 14-day trial and scale your team’s performance and effectiveness?


