If you’ve been looking for a project management tool with time tracking capabilities, you’ve probably heard of Jira.
Used by tons of companies, Jira is popular for its ability to support any type of project. While many teams use Jira time tracking to manage their projects, it’s not the only thing they offer.
From project roadmaps to Agile project development features, Jira has a host of great project management features to help you out.
In this article, we’ll also show you how to use Jira’s time tracker to track project time accurately.
We’ll also highlight 7 key Jira features that you can use to manage projects easily.
This Article Contains:
6 Other Cool Jira Features To Use In 2020
- Agile Development Templates Help Start Projects Easily
- Project Roadmap For Tracking Your Progress
- Analyze Your Projects With Detailed Reports
- Mobile Apps To Work On The Go
- Define Permissions For Seamless Task Management And Collaboration
- Extend Jira Functionality With Some “Extras”
What is Jira?
Developed by Atlassian, Jira is a web app that began as a bug and issue-tracking software and later evolved to suit all kinds of project management functions. And Jira’s project management abilities are what it’s best known for these days.
So what exactly does Jira do?
With Jira, you can plan, manage and track tons of items, ranging from projects and bugs to issues and tasks.
Jira’s extremely configurable and flexible nature lets you use it for a large selection of processes and environments, such as:
- Information Technology
- Healthcare
- Retail
- Finance
- Professional Services
- Manufacturing
However, Jira’s uses don’t stop there.
You can enhance its usefulness by integrating it with tons of apps, plugins and Google Chrome extensions.
The Jira packages
Jira is currently offered as four packages that focus on different aspects, but can all work together:
1. Jira Software
Jira Software is a project management tool for Agile teams and offers software development features like roadmaps and Scrum and Kanban boards. It comes with support from the Jira Data Center — Jira’s self-managed server product designed for enterprises.
2. Jira Align
Jira Align connects a business plan to its technical execution. It helps teams align with the overall plan by collecting team-level data, making it visible across your business in real-time.
3. Jira Core
Jira Core is a business project management software that helps keep teams organized. You can create workflows, monitor task details and measure team performance with customized dashboards or reports.
4. Jira Service Desk
Jira Service Desk is an IT Service Management (ITSM) solution designed for rapid service delivery. It lets you customize your service management processes to match how your teams work. You also get support from the Jira Data Center.
Time tracking in Jira
Understanding the time spent on tasks and issues helps you plan future sprints in your project life cycle and even analyze workload distribution.
But how can you tell how much time your team actually took to complete a Jira task?
Jira has a native time tracker, that tracks time in several different ways:
- Working hours per day
- Working hours per week
- Time formats: days, hours, weeks, etc.
Additionally, you can:
- View records of the time spent on each issue, task or sub-tasks.
- Create timesheets for invoicing clients.
- Evaluate and distribute tasks according to ongoing progress reports.
- Improve on the original estimate for deadlines based on historical data collected.
How to set up time tracking in Jira (step-by-step guide)
Before your team members can start tracking time in Jira issues, they must be given “Work On Issues” permission for the project in the settings (more on permissions later on in the article)
Additionally, to set up time tracking you must be an admin.
A. Configuring your Jira time tracking settings
To edit Jira’s time tracking settings, time tracking must be disabled.
Remember to re-enable it once you’re done configuring the settings.
Step 1
Choose Administration > Issues.
Then, select Issue Features > Time Tracking to open the Time Tracking page.
Step 2
If time tracking has been disabled (OFF), you’ll be to edit these settings:
- Hours per day: Enter the hour value in number (e.g., 6) or fractions.
- Days per week: Enter the day value in number (e.g., 5) or fractions.
- Time format: This will set the format, like hours/days, in the ‘Time Spent’ field when an issue is displayed.
- Default Unit: Select minutes/hours/days/weeks.
- Legacy Mode: Tick this checkbox if you prefer to use Jira’s time tracking features as they were before Jira version 4.2.
- Copy Comment To Work Description: Select this checkbox to copy any content entered in the Comment field to the Work Description.
![]()
Step 3
Click the Activate button to enable time tracking.
Note: If your project permission schemes already have the correct “Work On Issues” permissions for your users, then you don’t have to do anything else. Otherwise, proceed on to Step 4.
Step 4
To configure permissions:
- Click the permission scheme link from the Time Tracking page to display the Permission Scheme page.
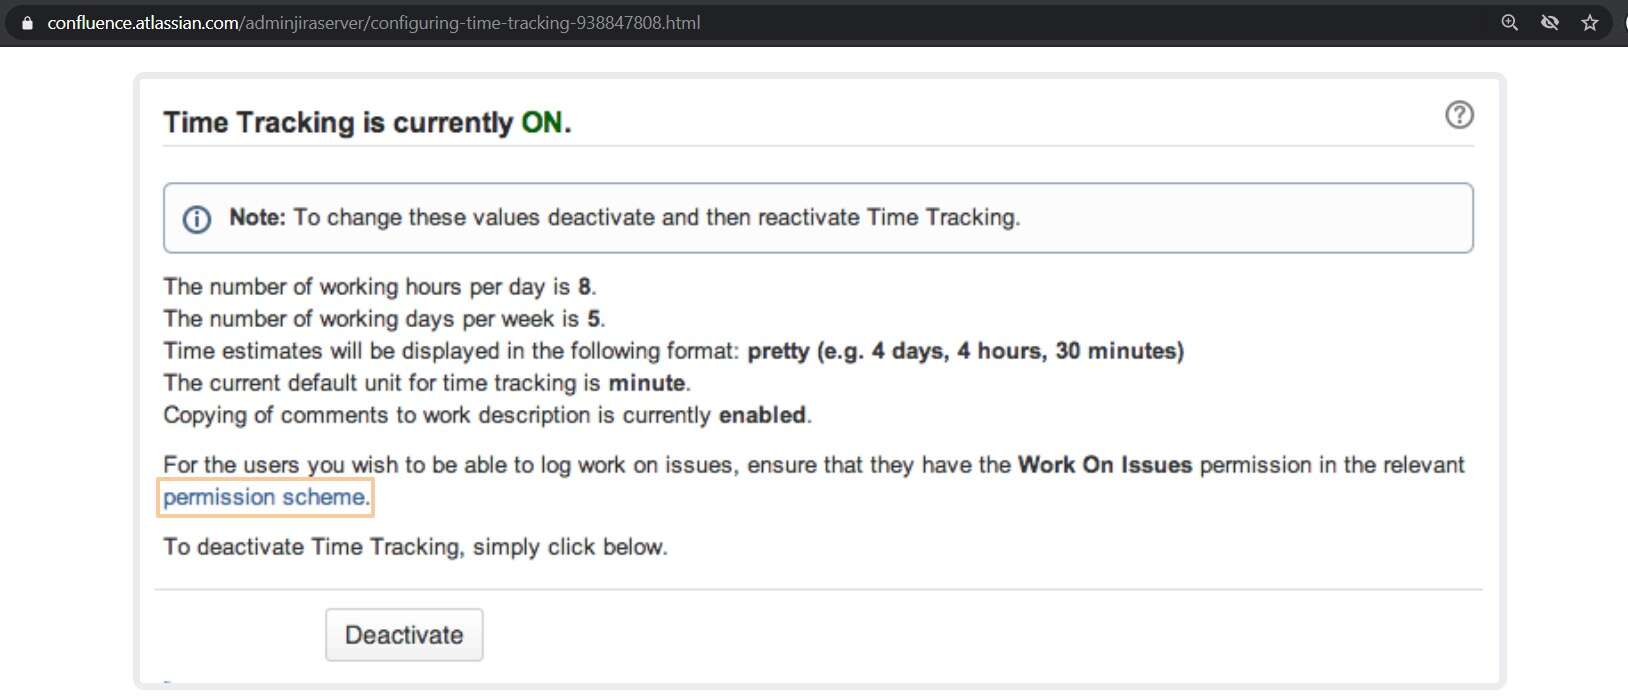
- Click the Permissions link for the scheme associated with the project that you need to edit. That’ll bring you to the Edit Permissions page.
Step 5
In the Edit Permissions page, go to the row labeled Work On Issues to see if it contains the correct users, groups or project roles. If it doesn’t, use the Add button under the Operations column to edit it.

Here are the five permissions related to time tracking:
- Work on issues: The user can log work on an issue.
- Delete all worklogs: The user can delete any worklog entries.
- Delete own worklogs: The user can only delete their own worklog entries.
- Edit all worklogs: The user can edit any worklogs.
- Edit own worklogs: The user can only edit only their own worklogs.
B. How to enable Jira time tracking
To enable time tracking in Jira:
- Select Administration > Issues.
- Then, select Issue Features > Time Tracking to open the Time Tracking page.
- Click on the Activate button to turn time tracking ON.
C. How to disable Jira time tracking
To disable time tracking in Jira:
- Select Administration > Issues.
- Then, select Issue Features > Time Tracking to open the Time Tracking page.
- Click on the Deactivate button to turn time tracking OFF.
You won’t lose any existing time tracking data by disabling/re-enabling this feature.
However, Jira time tracking only supports manual time entry, and including a work description is not mandatory, so you might not know the details of the work done. The accuracy of the time logged may also vary.
So if the native Jira time tracker doesn’t provide what you need, you can always use a time tracking integration to extend Jira’s time tracking functionality.
Luckily, you can log time with plenty of custom time trackers that integrate smoothly with Jira, like Time Doctor:
The Time Doctor – Jira Integration
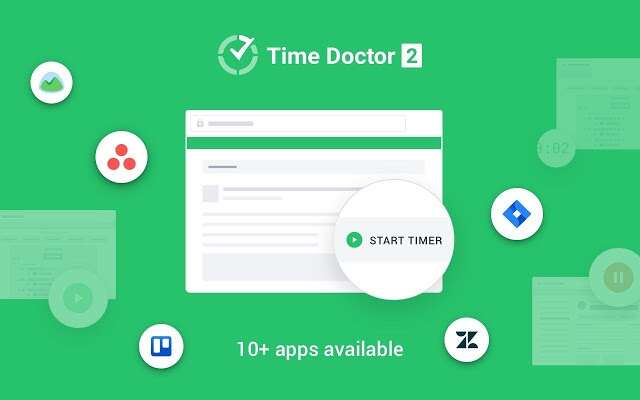
Time Doctor is a popular time tracking app that’s available as a Chrome extension to track time in Jira.
With the Time Doctor Chrome extension, you’ll be able to track how much time your teams take to work on issues and projects, in real-time. You’ll also know how they tackle these issues, helping you identify any productivity issues or areas of improvement for each team member.
Here’s how the Time Doctor-Jira integration helps you:
- Have a start and stop timer directly associated with Jira issues — you don’t have to use another app interface to sync tasks/start tracking time in Jira.
- Identify the time taken by each team member to complete a Jira issue/task.
- Know what each team member is working on in real-time.
- Evaluate your team’s performance through detailed time log and productivity reports.
- Use screenshots and web & app usage reports to analyze how someone works on a specific Jira issue.
- Monitor keyboard and mouse activity to determine the activity level of your employees.
While the Time Doctor Chrome extension syncs data with the Time Doctor desktop app in real-time, it also sends the tracked time back to Jira. This ensures that Jira’s worklogs match Time Doctor’s worklogs for the user.
Note: As Jira doesn’t accept worklogs less than 60 seconds, it’ll discard any Time Doctor tracking session shorter than 60 seconds. This can cause a slight difference between the tracked time in Time Doctor and the uploaded one in Jira.
How to use the Time Doctor Chrome extension for Jira time tracking
Here are the steps to activate the Time Doctor Chrome extension and use it for tracking time in Jira:
Step 1
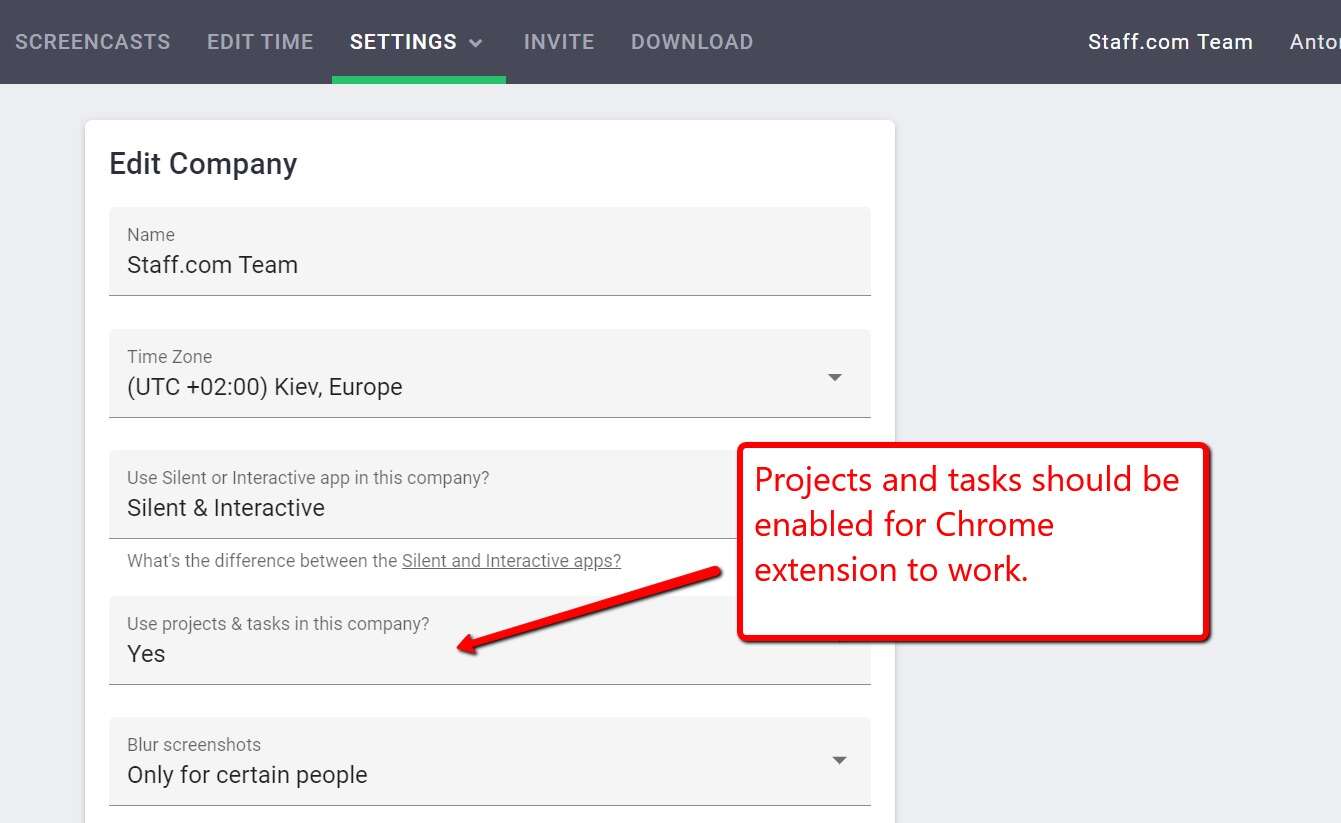
To use the Chrome extension, make sure you’re using the interactive and not the silent version of the Time Doctor desktop app. For this, you must enable the Projects & Tasks feature from Settings > Company Settings.
Step 2
Then, go to Settings > Integrations from the top menu and enable the Chrome extension.
Note: You must be an admin to do this.
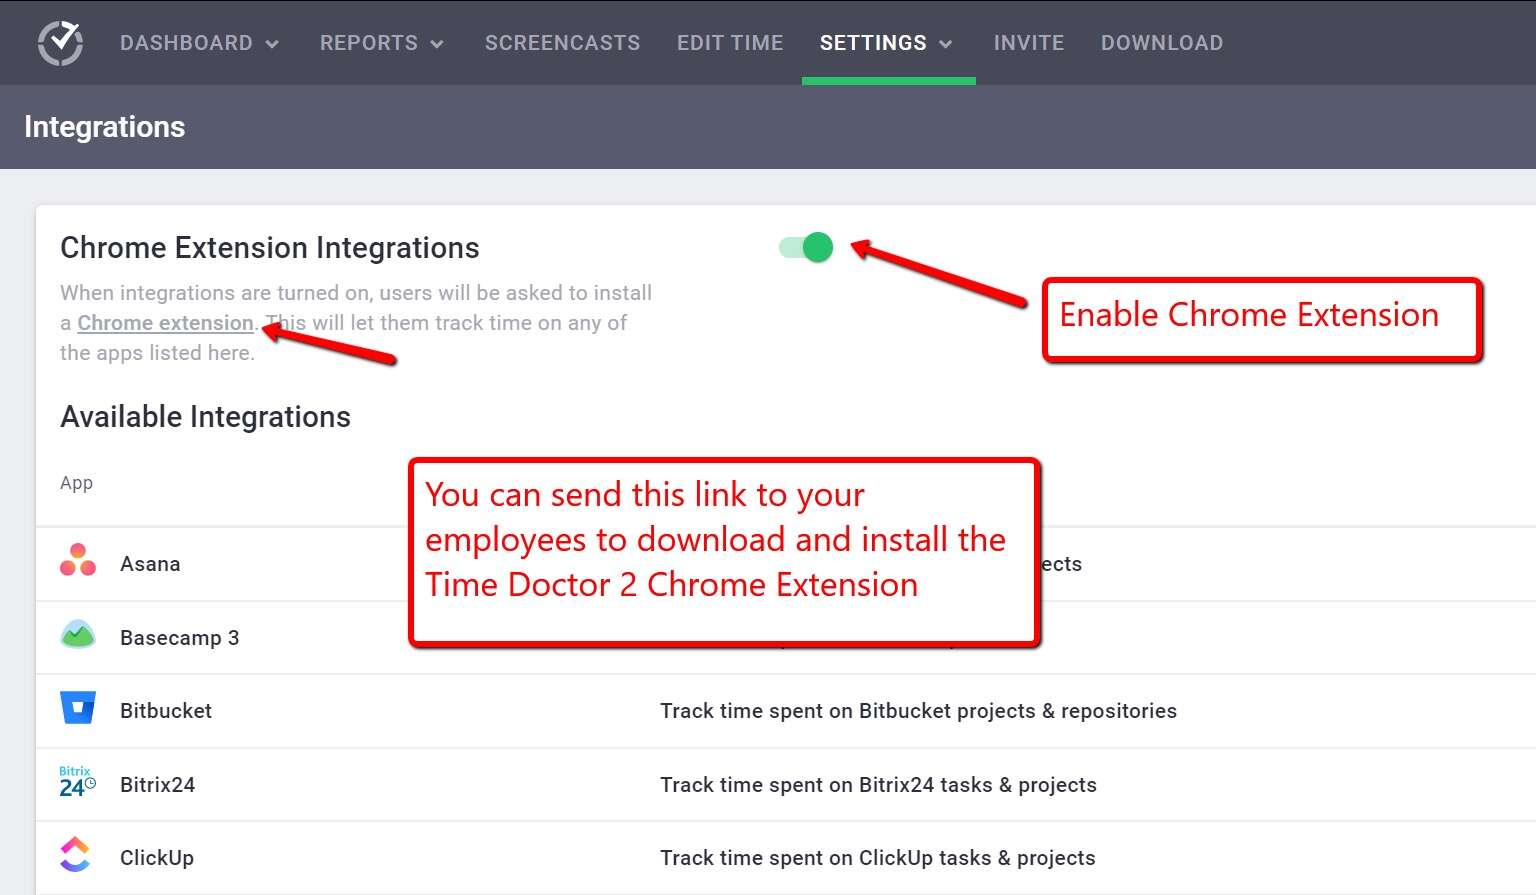
You can now ask your team members to install the Chrome extension from the Chrome web store.
Step 3
Once the extension is ready, navigate to any Jira task or issue and click on the Time Doctor Start Timer button alongside it to start tracking time.
Step 4
Once you’re done working, or just taking a quick break, click Stop Timer to stop the tracking time. Tracked work time is accurate to the second.![]()
Time Doctor also has an optional screenshot function that helps you take screenshots of your team’s individual computers at any time interval you specify.
This can be particularly helpful when you have teams working remotely, and you can’t drop by their workstations to see what they are working on.
6 other cool Jira features to use in 2020
Jira has tons of features that’ll help you manage projects easily.
Let’s take a look at six excellent Jira features you should be using today:
1. Agile development templates help start projects easily
Jira is built around the Agile development process. It gives you the streamlined user-friendliness of Scrum and Kanban boards, along with the added functionality of enterprise solutions.
And for added user-friendliness, you can quickly start an Agile project with one of Jira’s classic or next-gen templates:
A. Classic Jira templates
These templates are based on classic Agile work methodologies:
- Scrum: Lets you define user stories, tasks and workflows. Teams work from a backlog, determine story points and plan work in sprints. You can visualize task progress on a Scrum board and communicate on to-dos through comments.
- Kanban: Gives an Agile team a visual overview of all planned project activities and progress on a Kanban board. This overview allows for more efficient workload management, task prioritization and performance monitoring.
- Bug Tracking: For teams that don’t need boards and prefer to manage development tasks and bugs work logs in a list view.
B. Next-gen Jira templates
Next-gen boards are for teams who value simplicity above all else.
These templates are faster to set up than classic projects and let you quickly toggle between features like sprints or reports. This capability helps you mix and match the best elements of Scrum and Kanban as per your preferences.
You get templates like:
- Scrum (Next-Gen): Meant for Agile teams looking for fast setup and easier configuration experience. Monitor progress with a simple board, plan upcoming work in a backlog and organize development cycles into sprints.
- Kanban (Next-Gen): Suitable for teams who control work volume and priorities from a backlog. Instead of using sprints, you can monitor your work log in a continuous flow.
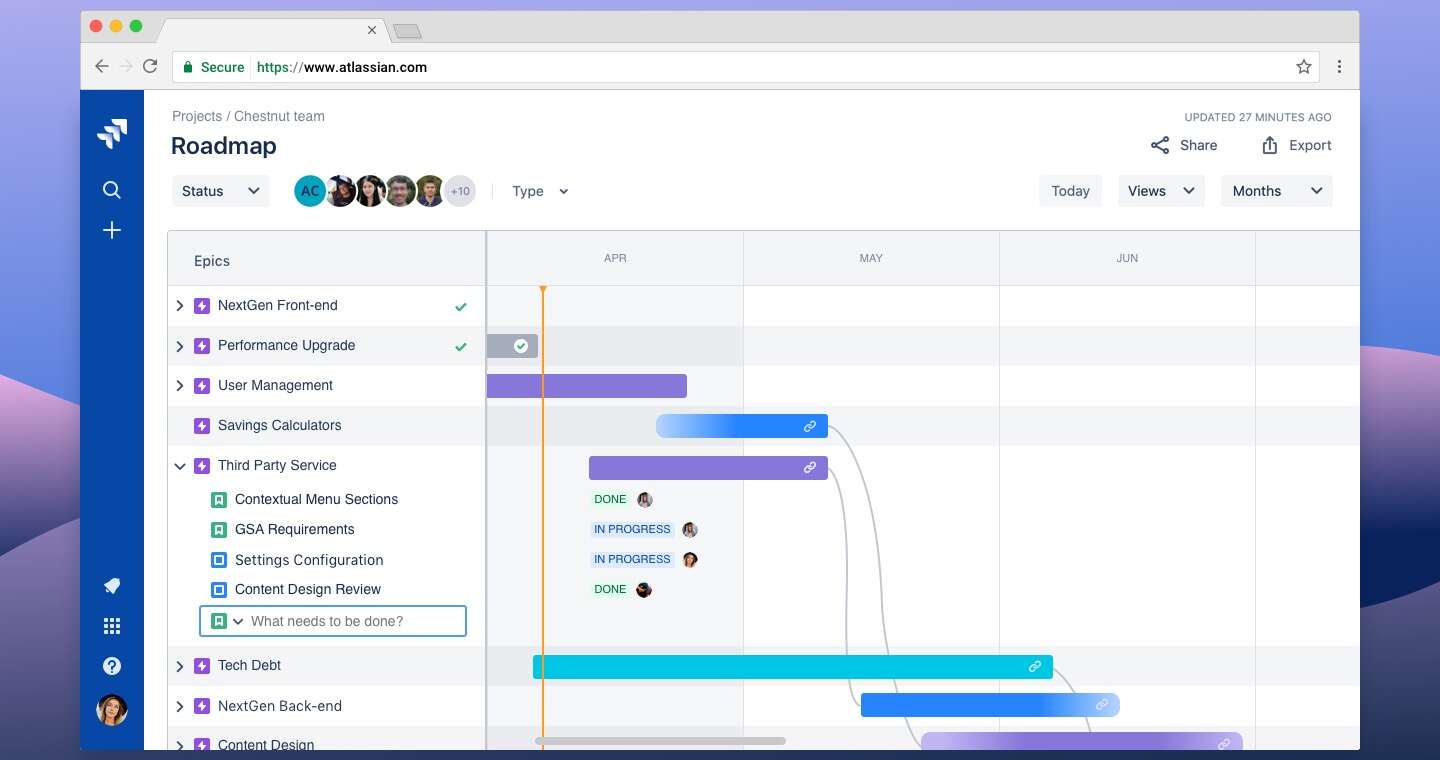
2. Project roadmap for tracking your progress
The project roadmap is the backbone of any project management plan in Jira, with the ability to track ongoing projects at any phase.
But what exactly does the project roadmap in Jira do?
It lets you outline a clear vision of the product you’re creating and define both short and long term goals. You can also include various Jira work items like a schedule, direction and a list of tasks to complete.
Its drag and drop feature makes it easy for you to quickly set up sprints and epics in the backlog for added flexibility. With the project roadmap in Jira, you’ll have access to all your project details at the tip of your fingers!
3. Analyze your projects with detailed reports
Jira offers various project reports that give you detailed information about your project, issues, sprints, and more.
But how does that help you?
Reports help you gain visibility into any situation in your project. And with the right data, you can gain insights into how to improve your project execution and delivery.
Here are a few reports you can access in Jira:
- Burndown Chart: Monitors the total work remaining and predicts the likelihood of achieving the sprint goal. This chart helps teams manage their progress easily.
- Sprint Report: Highlights the work completed or pushed back to the backlog in each sprint. Teams can use it to determine if they are overcommitting or under committing to each sprint.
- Cumulative Flow Diagram: Displays the status of issues over time, helping you identify potential bottlenecks in the workflow.
- Velocity Chart: Tracks the amount of work completed from sprint to sprint. You can determine your teams’ speed and estimate the amount of work that is realistically achievable in future sprints.
4. Mobile apps to work on the go
Do you think Jira is just meant for on-site office use?
Think again.
Apart from its desktop application, Jira has a powerful mobile app for Android and iOS platforms. The mobile app helps remote teams collaborate on work from anywhere in the world in real-time.
Some cool stuff you can do in the Jira mobile app include:
- Manage backlogs and boards
- Share relevant files and images
- Respond to comments, create and edit issues
- Get real-time notifications regarding project activity
5. Define permissions for seamless task management and collaboration
With various teams handling different tasks, how can you be sure that the right person is working on the right task?
Luckily, Jira’s Permissions can help you out there.
Permissions restrict access to specific issues or tasks to only those who are supposed to work on them. You can grant and change permissions by users, groups, or roles via a dropdown list. This can be done at the start of the project or while it’s being edited.
Jira handles project permissions in two ways:
A. Classic projects
Jira administrators manage classic projects through permission schemes.
A permission scheme is a set of users, groups or roles with specific access to certain issues.
Changes to a permission scheme will update the permissions of any classic project associated with that scheme. This way, you can easily adjust the permissions of multiple projects quickly.
B. Next-gen projects
Project administrators manage next-gen projects through custom roles. Next-gen projects have default permission roles like: Administrator, Member or Viewer.
Custom roles can be created to define permissions that are different from these defaults. For example, you could have a Scrum master role which is the only one that supports planning and scheduling sprints.
6. Extend Jira functionality with some “Extras”
As good as Jira is by itself, you can take it to the next level by integrating other tools, add-ons or plugins. Integrations help streamline data flow across multiple apps, making project management simpler.
Jira has integrations with tons of third-party apps and other Atlassian software — with many of them listed on the Atlassian Marketplace.
Some useful Jira integrations include:
A. Confluence
Confluence is an Atlassian software that helps teams collaborate and share knowledge easily. With the Jira-Confluence integration, you can:
- Create issues in Jira from Confluence.
- Display Jira reports/dashboards in Confluence.
- Navigate between any linked Jira issues and Confluence pages for traceability.
- Use Jira Service Desk to create knowledge base articles in Confluence.
B. Trello
Trello is a Kanban board-styled web-based application for organizing projects.
Once you integrate Trello to Jira, you can:
- Jump quickly to your Jira project by creating a link on your Trello board.
- Create new issues in associated Jira projects directly from Trello cards, and link back to those cards from Jira.
- Facilitate collaboration between the technical and business teams in your business.
Final thoughts
Jira is a great project management software for both Agile teams and traditional project teams as well.
From helping you with ready to go templates, mobile apps and customized permissions, there are a host of Jira features any company can benefit from!
Simply go through our list to find out the best Jira features for you and your team. And while you’re at it, why not integrate your Jira software with some of the handy integrations we highlighted?
With knowledge sharing solutions like Confluence and time tracking tools like Time Doctor, you’ll have no trouble managing every aspect of your project’s progress. This, in turn, will help you improve delivery estimates and skyrocket your team’s efficiency.
